Showing posts with label red. Show all posts

Thursday, September 16, 2010

DIY Wall Art

One of the ways to bring colour and life and focal points into a room is through wall art. One of the ways to do this on a budget is to... make it yourself!

Canvas art is by no means a new thing, but it is INCREDIBLY simple to make and can be really effective in spicing up an otherwise boring wall.

I was wandering through the kitchen section of Ikea last week not really looking for anything in particular... just wandering.. and came upon a set of 3 tea towels. The colours were perfect for our otherwise SUPER boring kitchen and rather than dirty them up and use them for their actual purpose I decided to cover  canvas panels...

here we go...
So the tea towels, in true Ikea fashion, are "swedishly" named Ellakajsa. I think they cost $7 for the set. I then picked up 3 40x40cm canvases for $5 each. The tools needed then are simply scissors and decent quality staple gun. I say "decent quality" because I bought a cheap one a while back and it a) hurt to use and b) was crap. It hardly permeated the surfaces I was trying to staple into!

And so then on the left you can see where I began folding and stapling. Really, that's it. I don't have a tip for corners, all I'll say is whatever you're covering ensure you always pull the fabric TIGHT before you staple. Then on the left you can see my 3 finished canvases (is the plural of "canvas" "Canvii"?)

And here they are up and proud in our kitchen. I added some red rick rack to the centre one so that I can peg invites and all-those-important-bits-of-paper-that-you-always-lose up. The pic on the right shows even more canvas art that I got stuck into that night. I'll be sharing where these were used very soon!

So there you go. Super easy and affordable. Perfect for almost any room in the house (I do challenge any of you out there to make some canvas art for their bathroom!). Just find the fabric you like and fold and staple and fold and staple!


Monday, September 6, 2010

Lusi's Lush Spare Room

A great friend and fellow blogger has been busy (in amongst mothering and homeschooling 4 beautiful children - I am exhausted just THINKING about how she does it all!) turning their youngest's room into a spare room. I love Lusi's bargain finds and great ideas!
Here's the before and after. It was a very sweet nursery to begin with, featuring a black, white and purple theme, but now it has been transformed into a striking black, white and red themed spare room. I love the shelves on the far wall that hide away a lot of of homeschooling supplies - Lusi strung up some elastic between 2 3M hooks (I agree Lus, I think we should BOTH be paid to advertise them - I use them everywhere too!) and hung some sheer Ikea curtains over it.
Here's a bargain hunters rundown:
Canvas above bed: $10 from GoLo
Set of black frames: $15 
Cushions on bed: $30 total (!)
Corner shelf: 99¢ off ebay (!!!)
 Paper lanterns: $5 each.

And there are even more bargains and creative ideas to be found on her blog Eternity Matters.


Wednesday, August 25, 2010

a lovely lounge

One of the first rooms I "officially" helped out on belongs to some of our favourite people - the Coe family. Their Little Guy #2 has a hilarious and almost obsessive attachment to our Little Man. It's so funny and I love it!

Anyway... So Adam and Nic had a pretty empty room and had just been given some $$ to fix it up, but didn't really know which direction to go in.. so I helped! The budget was limited, so I put my bargain hunting hat on, and off I went.

It all started with this mood board that I came up with after having my first chat with Nic.
They had already made an excellent eBay purchase of 2 chocolate brown lounges, so these gave me a great starting point. Ok, let's go on the tour!
Just a bit empty! But really, who could ask for a better place to start!
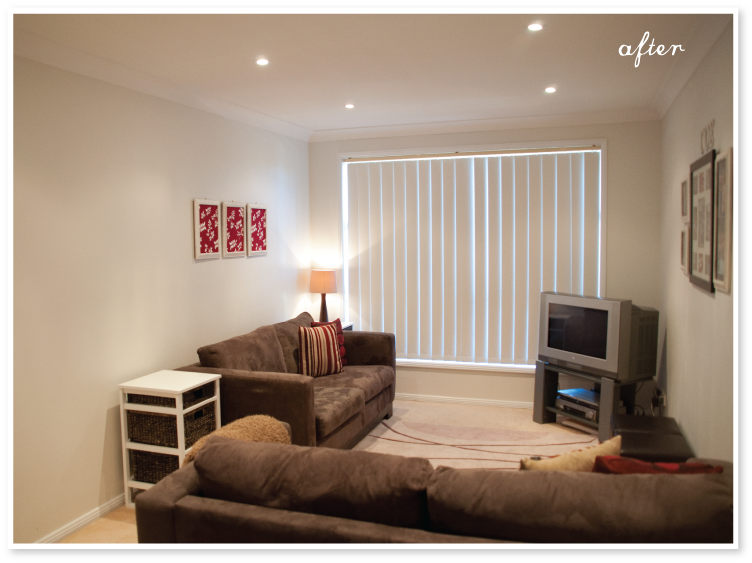
Great lounges right? I would like to think that this is the start of even more things to come for this room. When their budget allows there might be room for some more storage, but already, a big difference!
I really am a miracle worker - I was even able to disappear two little munchkins!
The three floral panels I made from a set of tea towels and the frames were old ones that Adam and Nic had that I sprayed white. The cushions were 2 for $15 from The Reject Shop (I lurrrrve that place!), the lamp base was $5 from a charity shop and the lamp shade was $8 on sale at Target. The rug was free from some friends (actually, from Pete and Lisa, whose gorgeous nursery - and not to mention new baby girl - you can see here).
Who doesn't love a good lamp/ entry table? (random Jess... random.) Anyway... The lamp table I found for $40 through Gumtree, but it was stained a yucky brown colour, so out came the white paint again! The mirror was a steal from Target - reduced from $90 to $30 (!!!), the lamp base was another charity shop find for $4 and the lamp shade, again from Target on sale at $8. (the camelia one of the boys brought home from their Nanna's place!)
The Coes had recently had some gorgeous photos taken by the very talented Hristina Piltz and Nic really wanted a way to show them off. I found the large frame at the Reject Shop for $30, and the other frames were again old ones the family already had that I sprayed white. I also had custom mats made to fit their pics. The white letters are from Lincraft and a few $ each.
So there it is! Hope you enjoyed the tour!
Oh! and here is that Little Guy #2 I was telling you about earlier. How could I not love that he loves my Little Man so much!

Monday, August 16, 2010

ellie's nursery

Our dear friends Peter and Lisa asked for some help with their nursery for their baby #3. They have 2 seriously beautiful girls already and so they thought that for bub #3 it might be nice to revamp all the old baby stuff and that's where I came in.


The first step was to repaint all the old nursery furniture (cot, change table and some picture frames) in crisp clean white. Pete borrowed a high pressure spray and did an amazing job on these! The next step to making the room feel new was to rearrange the furniture from it's old positions. Let's go on the tour!
Pete and Lisa didn't know if they were having a boy or a girl, so we went for primary colours minus the yellow as they already had the green feature wall painted and they liked the idea of bright and cheery colours. Ok, i know you can see a bit of pink in there too, that's because they had a GIRL! So rather than "baby-to-be"'s room, it's Ellie's
I made these elephant canvases after my first meeting with Pete and Lisa and they became somewhat the inspiration for the rest of the room. I love the happy coincidence that there is a song called "Ellie the Elephant!"

The canvases (fabric included) cost no more than $5 each and the "dream" was only $3 (from Spotlight) and I painted it white.
One of my FAVOURITE things in the room! Ellie's big sisters are Charlize (5) and Brianna (3) and they made their special contribution to the room with these handprints. Ellie's will pop on the bottom when mum and dad can pry her tiny hand out of a fist! (she is only a couple of weeks old!)
This cute mini alarm clock only cost a few dollars and it's not only a cute addition to the room , but a practical one too... perfect for counting the minutes when feeding.
The feeding corner. Complete with chair from Ikea for $35, cushion and throw from The Reject Shop for $18, giant rick rack trim for curtains for $2 a metre.
How great does that cot look! Excellent job Pete. 
I made this "grow" artwork for about $3 (This is one of the frames that Pete repainted). I think these artworks (or something like them) are going to become a signature for me in rooms I help out with. You can see a similar one here in Natalie's Nursery. The lamp I picked up for $15 and added the rick rack to match the curtains and lantern above the cot.The clothes hooks were $2.50 from a local $2.00 shop and were a hideous dark wood stain. Nothing a few thousand coats of red paint couldn't fix!
A final look back at this lovely room. Overall, including the purchase of those Billy shelves from Ikea, the whole makeover came in at under $200. A great combination of creative thinking, bargain hunting and elbow grease!
And here is precious Ellie, sleeping peacefully in her cot. Isn't she gorgeous?
And finally, here is our present for Ellie. I designed this baby announcement especially for her. I think Lisa is going to put it up above Ellie's cot. Cute.

Wednesday, August 4, 2010

baby and tea

Our great friend Taz (who is about 8 and a half months pregnant) recently celebrated her 30th birthday with a 50's themed party. I took along my new whizz bang camera and was unofficial shutterbug for the evening. Here is one of my fav pics of the night. I love Taz's flashy red nails and her gorgeous bump.


I also tried using a frame on this pic. I can't decide if I like it or not, but I got 50 free vector frames here and thought "hmm.. worth a try!" And... we always love a freebie over here!


Tuesday, August 3, 2010

penny pincher's party

Well, Little Man turned one on Sunday, and of course, there was a par-tay!

I wouldn't say it was completely budget conscious, but there were definitely some bargains to share.
Firstly, bunting. So easy to make and so effective as a decorating tool. These ones are "no sew" ones that some day I'll put up a tutorial for. All you need is fabric, rope, an iron and some iron on binding. The great thing about them is they can be used for more parties, or as room decoration - these ones are going into  Little Man's room very soon! (Don't you just love this paparazzi moment of Little Man eating his first piece of birthday cake!)

How great is Etsy! I ordered a printable party set from Dimple Prints for only $10 and it came with over 100 pages of great things to print out. From paper bunting to cupcake toppers (as seen here on the right) there was so much to choose from. Amazing value for money and while I probably only used about a third of it, I still think I got my money's worth.
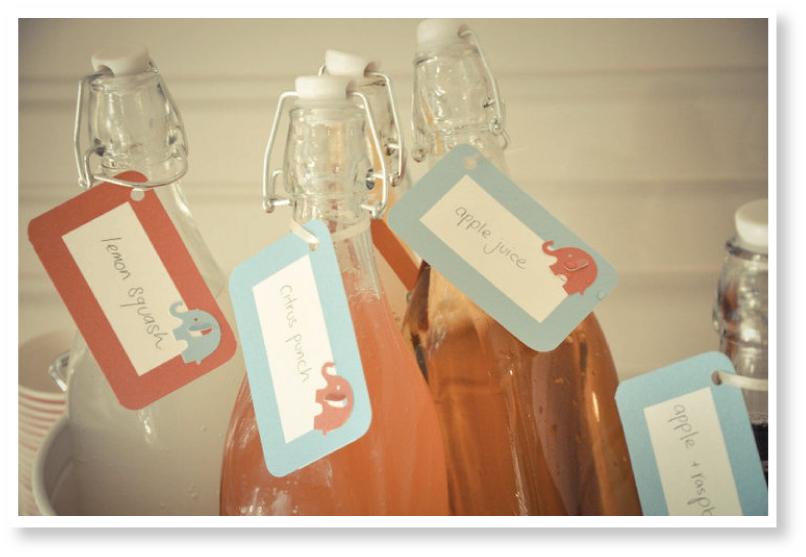
Glass bottles - $2 - Reject shop.

Not much more to say about that! Such and affordable way to add a special touch to something that normally gets shoved in a corner in a laundry bucket with some ice.
Matching outfit. Ok yes, you need a bit of sewing skills to whip these overalls (there are straps, they just kept falling off!) up, but the little tee is very easy to make, and just another way to personalise your little one's party. I picked up the white tee for $5 and used fabric scraps and some iron on binding to make this matching top.

Bubbles! So cheap and so much fun for kids of all ages (clearly!)

Containers for food. So I bought a LOT of stuff from the Reject Shop here in Sydney for this party. It's one of those places that if you can look past the cheap and nasty stuff there are a lot of great buys to be found. I got the red and white tin buckets for $3 each and the big glass jars for only $5 each! They are my favourite bargain! A quote from a friend when I told her the price "No WAY! Get out! I thought they would have been at LEAST $20 - $30!" Ahhhh the satisfaction of a bargain buy!

Much like the bunting, the great thing about all these containers as they can be used again and around the house. I'm thinking crayons and pencils for the tins and cookies or craft supplies for the jars.

And finally here are just a few more of my fav pics from the day.

(the candle was a little bit scary for our poor little muffin!)

Friday, July 9, 2010

Latest bargain purchases

So after our big move I realised I needed ("needed?" debatable) to find and check out all my local charity shops. I was not disappointed! Here are some of my recent bargain buys...


Some shoes and gloves for my Little Man. The shoes are leather, look brand new (I don't actually think they've ever been worn) and were $4. The gloves are so cute and super soft. $1, but then slashed to 50¢. 

Some more leather... a leather shoulder bag for me. Perfect size for wallet/ phone/ keys/ spare dummy and some wipes! Originally $12, but the shop this one came from was having a 50% off sale - $6 for leather?... yesssss!

And a bumper seat for Little Man. Not sure how much these retail for, but probably not the $6 I got it for!


Ok, so these didn't come from a charity shop, but they were still a bargain! They match the theme for Little Man's upcoming 1st birthday and at under $2 a pack - bargain!

Who else has picked up some bargain treasures lately?


Enhanced by Zemanta

Saturday, June 5, 2010

Red Hot

I was wandering through Spotlight (a fabric and craft Mecca of sorts) today.. a common occurrence. Sometimes I go in and it's daytime and then I leave and it's dark. It is somewhat of a black hole that I happily get sucked up in.

I made three very excellent finds:

The first is a very cute J (the first letter of our Little Man's name) complete with little man attached. It came in raw "wood" and while the packaging suggested adding boggled eyes, blue skin and shirts and ties to the little man, I opted for creating a silhouette by painting it in my favourite colour, red. I think it'll look lovely on the wall in Little Man's room when we move.

The second is a pair of my and Mr Jess' favourite vehicles of transport. The little bus reminded me very much of a London red double decker bus (my fav...sigh...) and Mr Jess is crazy about old planes.

These too came in "the raw" and a lick of red paint and some black and yellow texta fixed them up a treat.

So here's the total:
Letter J - $4.00
Bus and Plane - $3.00ea
Tube of red paint - $3.00 (I actually couldn't believe I didn't already own red paint given all the red in our house!)

Total: $13.00

Not bad for some totally original pieces of art to add to my Little Man's room... that is if I can steal the plane off Mr Jess!

LinkWithin

Related Posts with Thumbnails